June 20, 2020, 1:10 a.m. by lufy
original link: https://www.diskpart.com/articles/shrink-volume-with-unmovable-files-4348.html
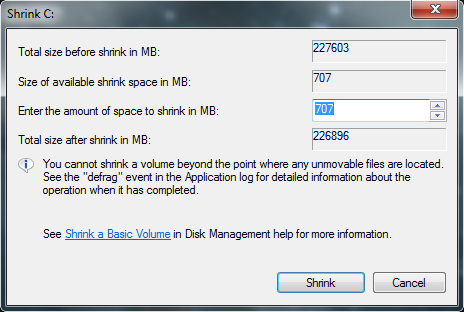
Unmovable files refer to the data generated by Windows that cannot be automatically moved by Windows built-in tool Disk Management, such as Hibernation, Pagefile and System protection. You cannot see these files in File Explorer, because they are hidden by default. Therefore, when you try to shrink a volume with unmovable files,Disk Management in Windows 10 gives you a really small space to shrink or even none. To fix this problem, you can manually disable Hibernation, Pagefile and System protection files, or use third party partition software that can automatically move the unmovable files.
As the tip given that you cannot shrink a volume beyond the point where any unmovable files are located, you need to manually remove the unmovable files. First of all, you need to show hidden files, so you can view these unmovable files. The easy and universal way for Windows 7/8/10 is via Windows’ search. Search “show hidden files and folders” and open it to uncheck Hide protected operating system files (Recommended) and check Show hidden files, folders, and drives.
To work this around, you need to disable the system files as many as you can at this very moment.
Second, disable System Protection and run Disk Cleanup and Disk Defragment. You can easily find them from the Windows search box.
Third, run the command “powercfg /hibernate off “from a command prompt to disable hibernation.
Fourth, disable the kernel memory dump. Go to Advanced Settings/ Startup and Recovery /Settings, and then change the drop down menu under Write debugging information to “None”.
Fifth, disable page files in Control Panel\System and Security\System\Advanced system settings\Settings under Performance\Advanced\Change, and delete c:\pagefile.sys files in File Explorer.
After that, you should be able to shrink your partition with a larger amount of space.
And command line disk partition on windows
Maybe, you will receive a message like "virtual disk service error the extended partition is not empty" when you remove an extended partition by Diskpart.
That all because you have already created one or more logical partitions in the extended partition, so you cannot directly erase an extended partition. The extended partition is directly divided by a disk and cannot be used immediately unless there is only one logical partition on the extended partition.
To solve this, you need to delete all the logical partitions first. Then, you can delete the extended partition.
Below is the guide:
Step 1. Run cmd as administrator. You can type cmd in the search box, select it from the context menu and run as administrator.
Step 2. Type diskpart in the new window.
Step 3. Type list disk
Step 4. Type select disk n (n is the number of disk)
Step 5. Type list partition
Step 6. Type select partition m (m is the number of partition)
Step 7. Type delete partition
step 8. Repeat Step 6- Step 7 to delete the rest of logical partition and the extended partition.
After you delete all the logical partition, you will get the free space. But it can only be used to extend logical partition. Thus, if you want to extend c drive or other primary partitions, you still need to delete the extended partition. Only to delete extended partition, you are able to get the unallocated space.
Comments:
No comments yet :(